Working with Big Cancer Data in the Collaboratory Cloud 2017 Module 2 Lab
This lab was created by George Mihaiescu
Introduction
Description of the lab
Welcome to the lab for Working with Big Cancer Data in the Collaboratory Cloud!
This lab will take you through the steps to setup and configure your virtual machine with Docker packages and will show you how to access data in the Cloud in an automated way, which is the first step in performing large scale analysis.
After this lab, you will be able to:
- Search for ICGC data stored in Collaboratory using the DCC portal (https://dcc.icgc.org)
- Obtain a manifest ID for the data you selected
- Use the icgc storage client packaged as a docker container to download the selected data (only if you are currently DACO approved and can obtain a valid token)
- Launch a VM and provide a user data script that automates the steps done in lab 1, while uploading the analysis results in the object store for permanent storage
- The last
Things to know before you start:
The lab may take between 1-2 hours, depending on your familiarity with Cloud Computing
The project used by the lab is shared by all students, so please do not perform any actions on other students’ virtual machines or other resources.
Requirements
- Laptop connected to Internet
- Web browser
- Collaboratory credentials (to be provided by lab assistants)
Note: The Collaboratory credentials you are given for the workshop will only work during the workshop.
Exercise I: Visit the DCC portal and search for data you need for your research
In your browser, go to https://dcc.icgc.org. Select the “Advanced search tab”.

Select the “Project: BTCA-SG” and “Gender: Male” and “Tumour stage: IVA”.
Click on the “View in Data Repositories” button.

Further filter the data selection by selecting the “Repository: Collaboratory” and “File Format: VCF”.

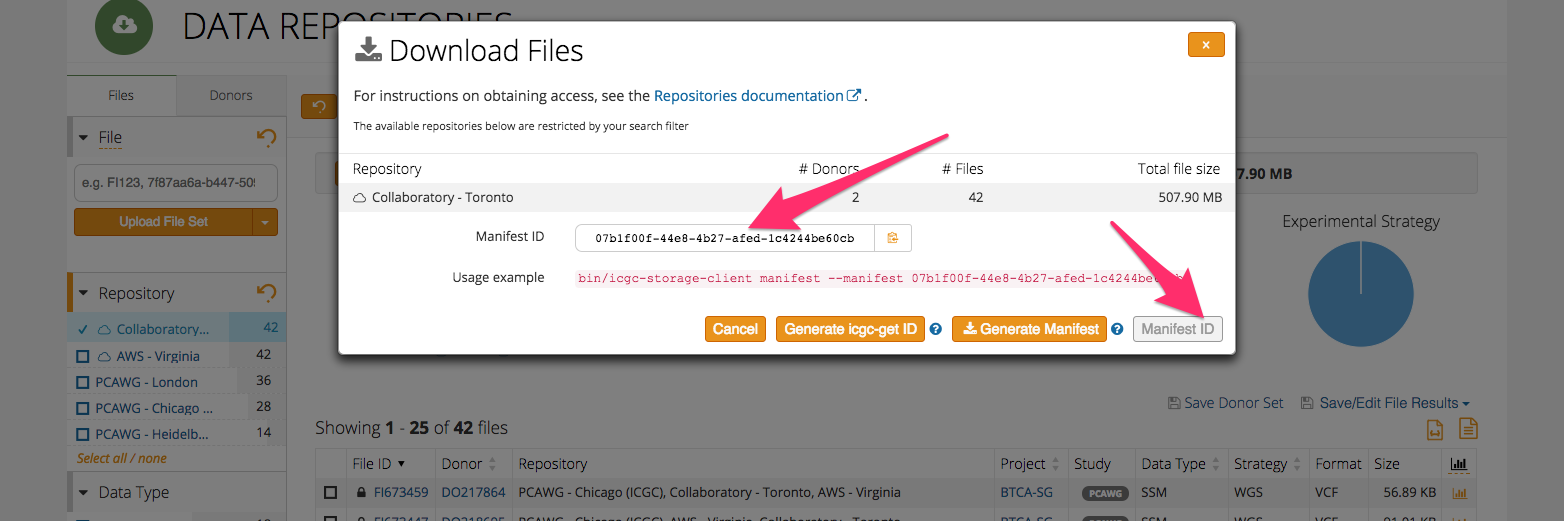
Click on the “Manifests” button and then on “Manifest ID” to generate a manifest ID for your data selection, and copy it as you will need it in the next steps.

SSH into your VM left running from first lab and try to download the files you selected using the manifest file downloaded from the DCC portal.
Run the icgc docker container providing the manifest file:
sudo docker run -v /tmp/:/data -v /home/ubuntu/application.properties:/icgc/icgc-storage-client/conf/application.properties --privileged icgc/icgc-storage-client bin/icgc-storage-client --profile collab download --manifest OBJECT_ID --output-dir /data
«««< HEAD Note: If you have DACO access for ICGC, you can log in the DCC portal and obtain a valid Collaboratory download token and add it to the “/home/ubuntu/application.properties” file so the download can succeed. Without a valid token, the download of the data selected from the DCC portal will fail.
Try to use the DCC portal to select other data sets. Can you find all the files for the skin cancer, female, tumour stage IIA and WGS analysis type stored in Collaboratory?
Note: If you havo DACO access for ICGC, you can login the DCC portal and obtain a valid Collaboratory download token and add it to the “/home/ubuntu/application.properties” file.
Without a valid token, the download of the data selected from the DCC portal will fail.
Try to use the DCC portal to select other data sets. Can you find all the alligned reads files for the Stage II melanoma cancer, female, stored in Collaboratory?
087107f6c1af9a874e72896badbe22f0bda6ae5f How many files are and what is their total size?
Think what type of flavor you could use to analyse the data, knowing only the disk space requirements of the analysis.
Exercise II: How to use cloud-init to automate provisioning tasks
For the purposes of this lab, we already prepared a VM in Collaboratory that provides UUID of the sample files to be analysed and keeps track of the queued, in progress and completed jobs, similar to the exercise discussed in lecture 2.
Launch an instance
In the menu on the left, select “Instances.” Click on the “Launch Instance” button and follow the same screens as in the previous lab to start an instance with the following settings:
- Name of your choice
- Source: Image and Create New Volume: No
- Image name: Ubuntu 16.04 - latest
- Flavor: c1.micro
- Network: CCRC_workshop_net (it should be already selected)
- Security group: default
- Key Pair: your keypair’s name (it should be already selected)
- Configuration: customize the script below with your Openstack credentials and your last name, and paste the script in the window
#!/bin/sh
# This script will install Docker with all its dependencies, download a Docker container and a random sample file
# Run bamstats on the sample file and upload the results into an object storage bucket

# First, you need to set some variable
project="CCRC_workshop"
user=""
pass=""
lastname=""


sudo apt-get update
sudo apt-get install -y \
        apt-transport-https \
        ca-certificates \
        curl \
        software-properties-common \
        unzip python-pip

sudo apt-get -y install python-keystoneclient

curl -fsSL https://download.docker.com/linux/ubuntu/gpg | sudo apt-key add -

sudo add-apt-repository \
   "deb [arch=amd64] https://download.docker.com/linux/ubuntu \
   $(lsb_release -cs) \
   stable"

# Install Docker engine
sudo apt-get update
sudo apt-get install -y docker-ce
sudo pip install python-swiftclient
sudo service docker restart

# Pull the docker container for the bamstats tool
sudo docker pull quay.io/briandoconnor/dockstore-tool-bamstats

# Obtain the VM's private IP
ip=`curl http://169.254.169.254/latest/meta-data/local-ipv4`

# Obtain a sample ID from the scheduler
uuid=`curl -g  -X GET http://142.1.177.126:8000/scheduler/small_sample_queue/ -H "X-IP: $ip"|tr -d ' '`

# Download the sample file
sudo wget http://142.1.177.126/samples/$uuid -O /$uuid

# Execute the bamstats utility packaged as a docker container
sudo docker run -v /$uuid:/$uuid -v /tmp:/home/ubuntu quay.io/briandoconnor/dockstore-tool-bamstats  /bin/bash -c "cd; /usr/local/bin/bamstats 4 /$uuid"


# Upload the bamstats report to a private bucket
cd /tmp
echo "Upload the reports"
swift --os-auth-url https://console.cancercollaboratory.org:5000/v2.0 --os-tenant-name $project --os-username $user --os-password $pass post $lastname
swift --os-auth-url https://console.cancercollaboratory.org:5000/v2.0 --os-tenant-name $project --os-username $user --os-password $pass upload $lastname --object-name $uuid/bamstats_report.zip bamstats_report.zip

# Let the scheduler know that the sample was completed
curl -g -X POST http://142.1.177.126:8000/scheduler/small_sample_completed/ -H "X-IP: $ip" -H "X-UUID: $uuid"

# Finally, start a simple python web server to serve the bamstats html report:
cd /tmp && unzip /tmp/bamstats_report.zip
sudo python3 -m http.server 80 &

Launch the instance by hitting the “Launch” button. It will take a few minutes for the instance to start.
You can watch the script execution progress by selecting “View Log” from the drop-down menu on the right side:

You can then click on View Full Log and refresh the browser page (Ctrl+R) every minute to update it with the output generated:

Associate a Floating/Public IP Address
By default, the VM will have a private IP allocated that is only reachable from inside your virtual network (other VMs connected to the same network).
Delete the VM created in the first lab to free up your floating IP, or dissassociate it using the drop-down action menu on the right side.

After the floating IP is free, you can associate it with the newly created VM.
Visit the page to see the statistics for that sample BAM: http://142.1.177.XXX/bamstats_report.html
XXX is the last octet from the floating IP address you assigned to the instance.
Finally, visit the Object store, Containers section in dasgboard to see your analysis result that was uploaded in the bucket named by your last name:

If you increased the quantity to 30 instances you would have the same results as having 30 users automate the analysis, but using a single VM at a time
Congratulations, you have completed lab 2.