Put thought into your user or organisation name
Learning Objectives
- Understand the difference between individual and organisation accounts
- Be able to create a site repo
The Different Account Types
Individual Accounts
- All users have individual accounts. This is your identity on GitHub
- Individual accounts have only one owner but can have many collaborators
- Include unlimited public repos and unlimited collaborators
- Can pay for private repos
Organisation Accounts
These accounts are good for working as part of large groups with different people needing write access to different files/repos.
- Shared accounts with (many) owners, administrators, and members with different levels of privileges and access
- Include unlimited public repos and unlimited collaborators
- Have the ability to assign teams to repos so that only certain people have access to some repos
- Can require all organisation members to use two-factor authentication
- Can pay for private repos, apply for education discount, or request a not-for-profit account for free private repos
Getting a Not-For-Profit Organisation Account
These accounts include unlimited private repos and unlimited users, free of charge.
Available to official nonprofit organizations and charities that are nongovernment, nonacademic, noncommercial, nonpolitical in nature, and have no religious affiliation.
To request a not-for-profit account, visit https://github.com/nonprofit.
Special accounts are also available to academic institutions.
Create Your Site Repo on GitHub
Your site repo is just like any other repo you would create. What makes it special is that your site repo will contain all the materials for creating your website (style sheets, layouts, etc.).
In an internet browser, go to github.com and log into your account or your organisation account.
To create a new repo, at the top of the page in the black navigation bar, click on “+” and select “New repository”.

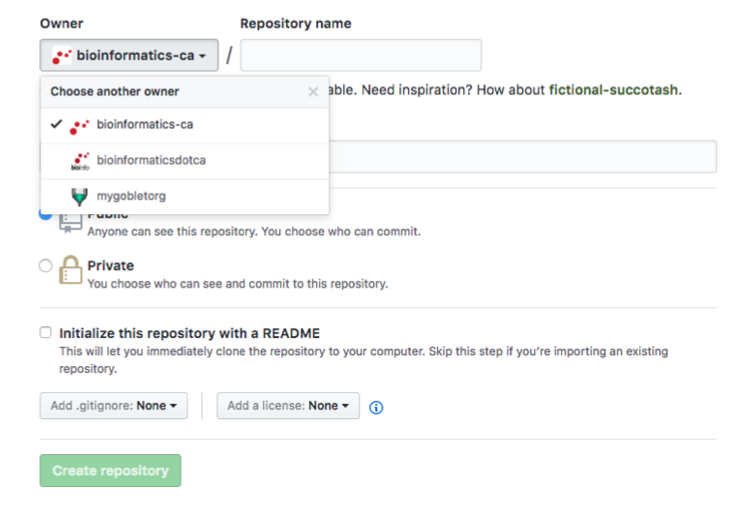
Under “Owner”, ensure that the correct owner is selected in the dropdown since you might be an owner of an individual account and several organisations.

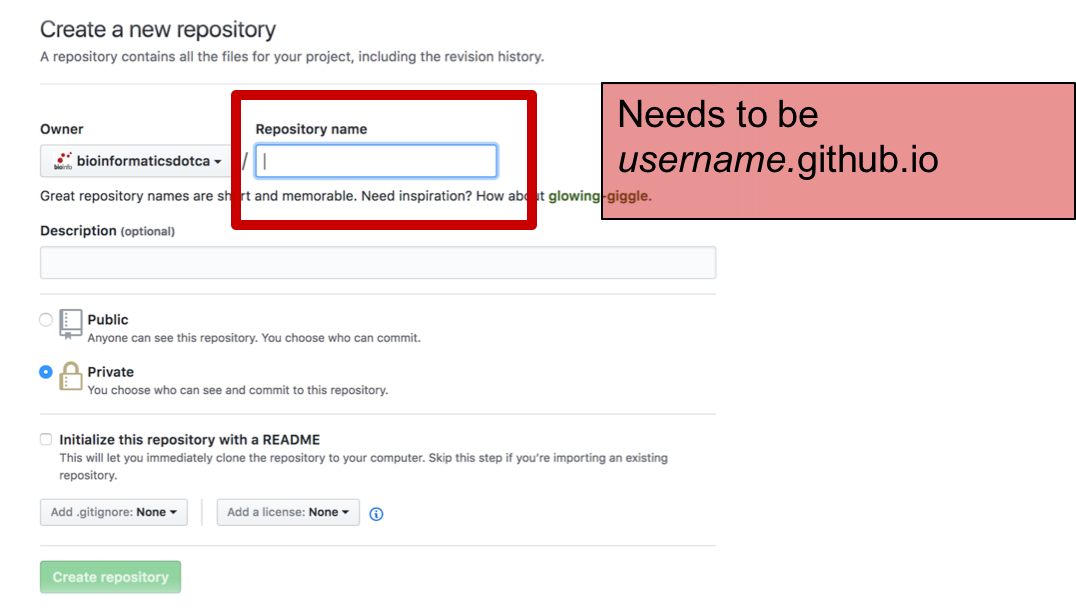
Under Repository Name, in the textbox, enter the name of your site. This is where the name of your individual account or organisation account becomes very important. The format of the name is username.github.io or organisation.github.io (where username is your GitHub username and organisation is your GitHub organisation name). Your repo will not render as a website if you do not use this format.

Decide whether the repo will be public (anyone on the internet can view it but only those you choose can change it) or private (only you and those you choose can view it and change it).
It isn’t necessary to initialize with a README or license.
Hit the green “Create repository” button.
Pull Your Repo to Your Computer
Switch over to a terminal (Terminal on Mac/Linux, Cygwin or similar on Windows) on your computer.
Create a new directory to store your GitHub files and move into that directory.
mkdir GitHub
cd GitHub
Next, create a repo for your website and move into your repo, initialize it as a git repo (for version control), add a README, and add the remote. To do this, type:
mkdir username.github.io
cd username.github.io
git init
echo "# mygobletorg.github.io" >> README.md
git add .
git commit -m "first commit"
git remote add origin https://github.com/username/username.github.io.git
git push -u origin master
Remember to change username to your user or organisation name.
And that’s it! You’ve created the repo for your site.
Commands Used in This Rule
mkdir - creates a new directory
cd - allows you to move into a directory
git init - initializes a repo/directory as a git repo/directory for version control
echo - prints the text that comes after it
>> - redirects output from the screen to a file
git add - puts new changes on list of changes to confirm for version control
git commit - confirms new changes for version control
git remote add - adds an address to send changes to
git push - sends confirmed changes to remote (ie GitHub)